Thursday 28 August 2014

DYNAMICALLY DISPLAY INVENTORY DIMENSION

We have to follow some steps:

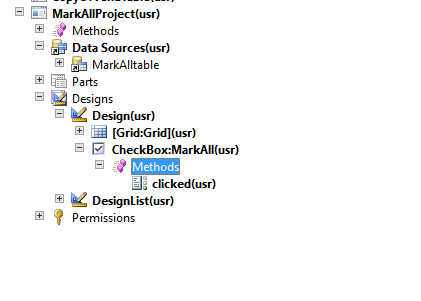
1.Create a table with two fields,


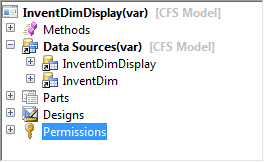
2. Create a new Form. My form has two data sources, InventDimDisplay and InventDim (required) and a grid.
Image
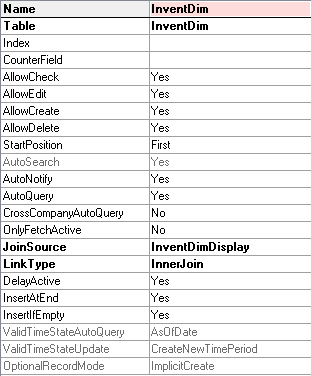
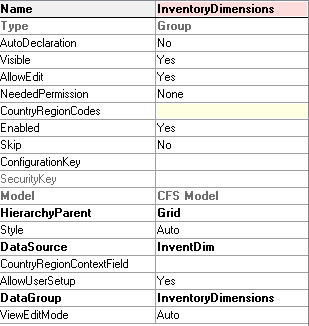
3.Set the InventDim data source properties to:-

Image
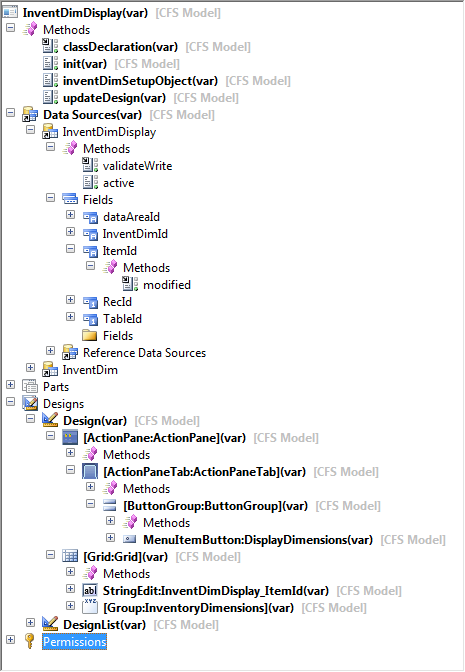
4.On form Design, create a new Grid and move the ItemId to your grid and then create a new Group and then set the properties below:
Image

On class declaration add the following piece of code:
public class FormRun extends ObjectRun
{
               // Declare the class InventDimCtrl_Frm_EditDimensions
    InventDimCtrl_Frm_EditDimensions        inventDimFormSetup;
}
5. Now, create a new method in form.
public InventDimCtrl_Frm_EditDimensions inventDimSetupObject()
{
    return inventDimFormSetup;
}
6. Override the form’s method Init.
public void init()
{
    super();
            // This method will be used to show default fields at form startup
    element.updateDesign(InventDimFormDesignUpdate::Init);
}
7. Create a new method, this method is responsible to show the Inventory Controls.
void updateDesign(InventDimFormDesignUpdate mode)
{
    InventDimParm inventDimParmVisible;

    switch (mode)
    {
        // Form Init
        case InventDimFormDesignUpdate::Init    :
            if (!inventDimFormSetup)
            inventDimFormSetup  = InventDimCtrl_Frm_EditDimensions::newFromForm(element);
            inventDimFormSetup.parmSkipOnHandLookUp( true);

            // Use the methods on InventDimParm
           // to set which dimensions to show when form is initialized
           inventdimparmvisible.inventsiteidflag       = true;
           inventdimparmvisible.InventLocationIdFlag   = true;
           inventDimFormSetup.parmDimParmVisibleGrid(inventDimParmVisible);

        // Datasource Active
        case InventDimFormDesignUpdate::Active  :
           inventDimFormSetup.formActiveSetup(InventDimGroupSetup::newItemId(InventDimDisplay.ItemId)); //InventDimDisplay is the datasource name.
           inventDimFormSetup.formSetControls( true);
           break;

        // Datasource Field change
        case InventDimFormDesignUpdate::FieldChange :
           inventDimFormSetup.formActiveSetup(InventDimGroupSetup::newItemId(InventDimDisplay.ItemId)); //InventDimDisplay is the datasource name.
           InventDim.clearNotSelectedDim(inventDimFormSetup.parmDimParmEnabled()); // InventDim is referring to datasource name
           inventDimFormSetup.formSetControls( true);
           break;

        default :
           throw error(strFmt ("@SYS54195", funcName()));
    }
}
8. We have to create a method on data source to update our table InventDimId and use the method Active to refresh the controls.
Override Data source’s method Active.
public int active()
{
    int ret;
    ret = super();
    element.updateDesign(InventDimFormDesignUpdate::Active);
    return ret;
}
9. Now, override the method Modified() for ItemId field in your data source.
public void modified()
{
    super();
   
    element.updateDesign(InventDimFormDesignUpdate::FieldChange);
    InventDim.clearNotSelectedDim(element.inventDimSetupObject().parmDimParmEnabled());
}
 
We have to create a MenuItemButton to call the Display Dimension form where the user can select which dimensions he want to display.
Set the following properties:
MenuItemType: Display
MenuItemName: InventDimParmFixed
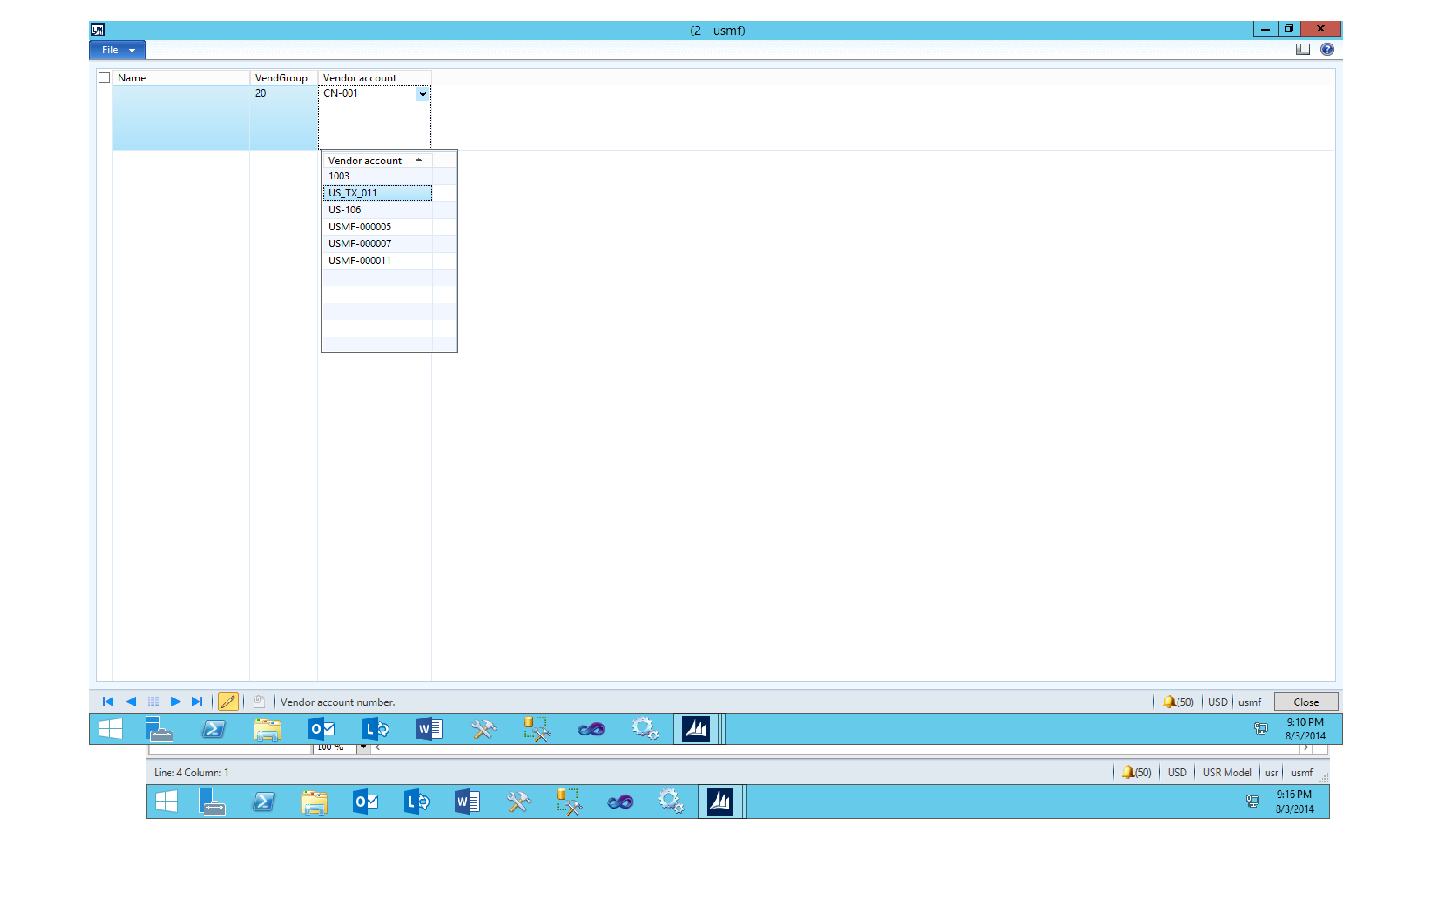
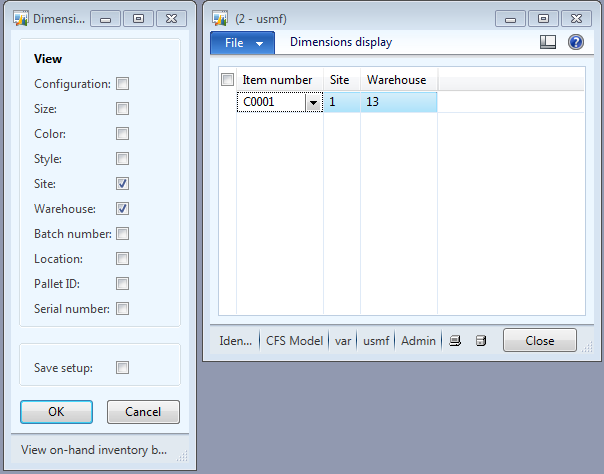
10. By the end of this tutorial, your form should look like this.
Image
11. The results:

Image


Wednesday 20 August 2014

ENABLING LOOKUP FIELDS FROM MULTIPLE TABLES & SELECTION OF MULTIPLE RECORDS


Scenario:-

                 Create two tables.Create one query in AOT. Add that Tables into Query as a Datasource. The Second table should be added as a childdatasource. After add that Query as  Datasource for a new  Form. Now  add one StringEditcontrol in the form. If open the form the control should enable  lookup all the records from both tables in Query. And If multiple records are selected all that records should display in the control.

We have to follow some steps....

Step 1:
               Create two tables (ParentTable,Child).


Step 2:
               Create a Query(ParentTableChild) in AOT and Add the table(ParentTable) as a Datasource into the Query. The Second table(Child) should be added as a childdatasource.


Step 3:
              Create new form and drag and drop the query(ParentTableChild) into form.


Step 4:
              Create a StringEdit Control(LookUpField) under Design node.


Step 5:
              Now, to enable multiselectlookup in the control we need to use a System class(SysLookupMultiSelectCtrl).

Step 6:
            we need to write code under init() method....


ClassDeclaration:-
public class FormRun extends objectRun
{
SysLookupMultiSelectCtrl msCtrl;
}

Public void init()
{
super();
msCtrl=SysLookupMultiSelectCtrl ::construct(element,LookUpField,querystr(ParentTableChild));
}


Wednesday 13 August 2014

USING CHECKBOX MARK / UNMARK WHOLE RECORDS

Scenario:-

                  I have a table(MarkAllTable) with one Boolean field(Mark) and add this table as a datasource into the  form(MarkAllTable).Now I want to add one checkbox control into the form. The condition is if I check this checkbox all records should be checked and if I uncheck this checkbox all records should be unchecked. Based on Checkbox we want to mark or unmark all records in the form.
 
we have to follow some steps....
Step 1:
             Create a table(MarkAllTable) and add fields. Add one field as Enum and set the property as Boolean.


Step 2:
              Insert some Records into the Table and add that Table as a Datasource into the form.Now drag and drop the fields into design level.
 
Step 3:
            Add a CheckBox control(MarkAll) into the design level.
 
 
Step 4:
            Now we want to write code for mark or unmark the records.


Write code under CheckBox Control in Clicked() method.
 
public void clicked()
 
{
MarkAlltable markAlltable1;
super();
 while select MarkAlltable
 
{
if( MarkAll.value()==1)
 
 
{
MarkAlltable.Mark=boolean::true;
 
 
}
else
 
{
MarkAlltable.Mark=boolean::false;
 
 
}
MarkAlltable.update();
}

 
MarkAlltable_ds.executeQuery();


}
 
Step 5:
        Now we have the output.


Monday 11 August 2014

FETCH RECORDS FROM ONE FORM TO ANOTHER FORM THROUGH MENUITEMBUTTON

We have to follow some steps,

Step 1:
Create one Table with some Fields .Then add this table into form(HistoryForm1) as a datasource.Drag and Drop the fields into design.


Step 2:
Create another one table with some fields.Here Also add this table into form(HistoryForm2) as a datasource.Drag and Drop the fields into design.

Step 3:
Now create one MenuItemButton(NextForm) into the Form B.

Step 4:
Now We want to fetch the records from Form A to Form B.so we want to write code under datasource level in FormA.


 Write the code in validatewrite() method:


public boolean validateWrite()
{

boolean ret;
LinkTable2 linkTable2;


ret = super();
linkTable2.RollNo=TaskAddDelete.IdNumber;

linkTable2.StudentName=TaskAddDelete.StudentName;

linkTable2.insert();


return ret;


}

 Step 5:
Now we insert some records in HistoryForm1 and Click that Button(NextForm) HistoryForm2 will be opened with Same Records as HistoryForm1 .

HOW TO INSERT RECORDS FROM FORM TO TABLE USING UNBOUND CONTROLS

We have to follow some steps,

Scenario:-
                I have one form with two controls and two buttons. And I have one table.i want to add and delete records in the table by form.so now I am giving input into these two controls if I click add button records are saved into that table. If I click delete button records are deleted from that table.
Step 1:

Create a form with two controls and two buttons.
1.StudentName(Unbound Control) 1.Add button
2.IdNumber(Unbound Control)      2.Delete button


 Unbound Control :-
                                  Unbound controls are form level Design controls which does not added from a "Datasource."

Step 2:

Then create a table in which records should be save and delete.

Step 3:

Write the code in Clicked() method under Add button for adding the records.


void clicked()
{

TaskAddDelete taskAddDelete1;
super();

taskAddDelete1.StudentName=StudentName.valueStr();

taskAddDelete1.IdNumber=IdNumber.value();

taskAddDelete1.insert();
}


Step 4:

Now write code in Clicked() method under Delete button for deleting the records.

void clicked()

{

TaskAddDelete taskAddDelete1;
super();

delete_from taskAddDelete1 where taskAddDelete1.StudentName==StudentName.valueStr() &&


taskAddDelete1.IdNumber==IdNumber.value();
}

Step 5:

Finally open our table and you can find the records which we tried to add and delete.


Friday 8 August 2014

DISPLAY CURRENT MONTH TRANSACTIONS FOR A PARTICULAR CUSTOMER


We have to follow some steps:

Step1:
Create a table Name as CustTransForm with fields CustAccount ,TransactionDate.


Step 2:

Add the Table As a Datasource into the Form.(CustTransForm)


Step 3:

Add CustTransForm into MenuItem-->Display, in AOT.

Step 4:

Add a MenuItemButton in ActionPane of the CustTableListpage form, for Calling the CustTransForm, by setting the MenuItemButton's property MenuItemName :CustTransForm.

Step 5:

Now we need to display the Current Month Transactions in the CustTransForm whenever it is called from CustTableListPage form.

For this we can write init() method and one User-defined method(TransMethod()):-


Step 6:

Write Code for Init() method in Form(CustTransForm) level:

public void init()

{

super();

custTable = element.args().record();

CustTransForm.setTmpData(element.TransMethod());

CustTransForm_ds.executeQuery();

}

Step 7:

Write Code for TransMethod() in Form(CustTransForm) level:

CustTransForm TransMethod()

{

int startDate=mthOfYr(today());

while select custTrans

where custtrans.AccountNum==custTable.AccountNum

{

if(mthOfYr(custTrans.TransDate)==startDate)

{

custTransForm1.CustomerAccount=custTable.AccountNum;

custTransForm1.TransactionDate=custTrans.TransDate;

custTransForm1.insert();

}

}

return custTransForm1;

}

Step 8:

Now we get the output:-


Monday 4 August 2014

How to Filter the Vendor Accounts based on Particular Vendor Group


We have to follow some steps:

Step 1:
             Create new table in AOT.

Step 2:
             Add two fields  into the table.

Step 3:
             Go to properties change the first field ExtendedDataType as VendGroupId.


Step 4:
             Go to properties change the second field ExtendedDataType as VendAccount.


Step 5:
            Add the Table into Form as Datasource.

Step 6:
            Write the code in lookup method(override) under VendAccount Control.
            
public void lookup()
 
 
{
VendTable vendTable;
ProjectTable projectTable1;
 
SysTableLookup sysTableLookup = SysTableLookup::newParameters(tablenum(VendTable), this);
Query query = new Query();
QueryBuildDataSource queryBuildDataSource = query.addDataSource(tablenum(VendTable));

 sysTableLookup.addLookupfield(fieldnum(VendTable, AccountNum));
queryBuildDataSource.addRange(fieldnum(VendTable, VendGroup)).value(ProjectTable.VendGroup);


sysTableLookup.parmQuery(query);
sysTableLookup.performFormLookup();
}
 
Step 7:
            The Final output Window: